How To Create the Ultimate Halloween Treat Table

Halloween is just around the corner and I’m excited to share how easy it is to create a spooky dessert table on a budget by shopping thrift. I’ve recently partnered with Savers (also known as Value Village here in WA!), one of my go-to thrifting destinations for party planning!
When I create dessert tables, I never create the same table twice. I like each table to have a clever theme and chic look. I like to think of thrifting as the ultimate treasure hunt. When you thrift, you’re able to find unique pieces that don’t break your budget.

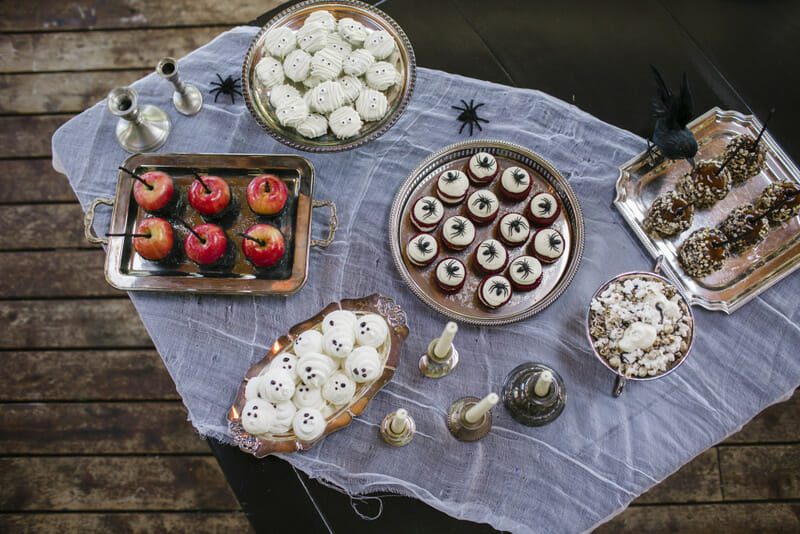
To get your creative wheels turning, head to your local Savers. Take your time and browse each section. With a little creativity, you can transform just about anything into something fantastic. As I browsed their home ware section, I came across a great variety of silver trays, bowls and platters. As soon as I saw them, the idea of an old abandoned “haunted” house came to mind. I knew exactly what my table would be…old, tarnished and silver, with spooky accents! I piled them into my cart and headed for the candle aisle to look for silver candle holders. I scored with a variety of candle holders in an assortment of sizes and widths.

They had a huge Halloween section where I found a couple black crows, paper bats, black spiders and bags of cobwebs. They’d make the perfect pop of “spooky” on my Halloween treat table. Near the check out, I picked up a handful of black roses, perfect for a couple mismatched silver goblets and creamers.

Keep your eye out for rare pieces. I found this great silver compote that made the perfect container for popcorn! Even if the entire set of something isn’t there, that’s ok!! Grab the lone piece and pair it with something similar. Mismatched items actually look really cool combined with other “like” items.

If you can’t find everything you need in one shopping trip, don’t panic. 10,000 new items are added to shelves EACH DAY. Check back in a day or two!

Once I had everything I needed, I got to work. Using a few of the silver trays and candle holders and a dab of gorilla blue, I made dessert pedestals! It’s always great to add height into your display to keep your treat table from looking like a potluck. You can even use some of your props for extra elevation. I grouped the mismatched candlesticks together which added height and an eerie ambiance.

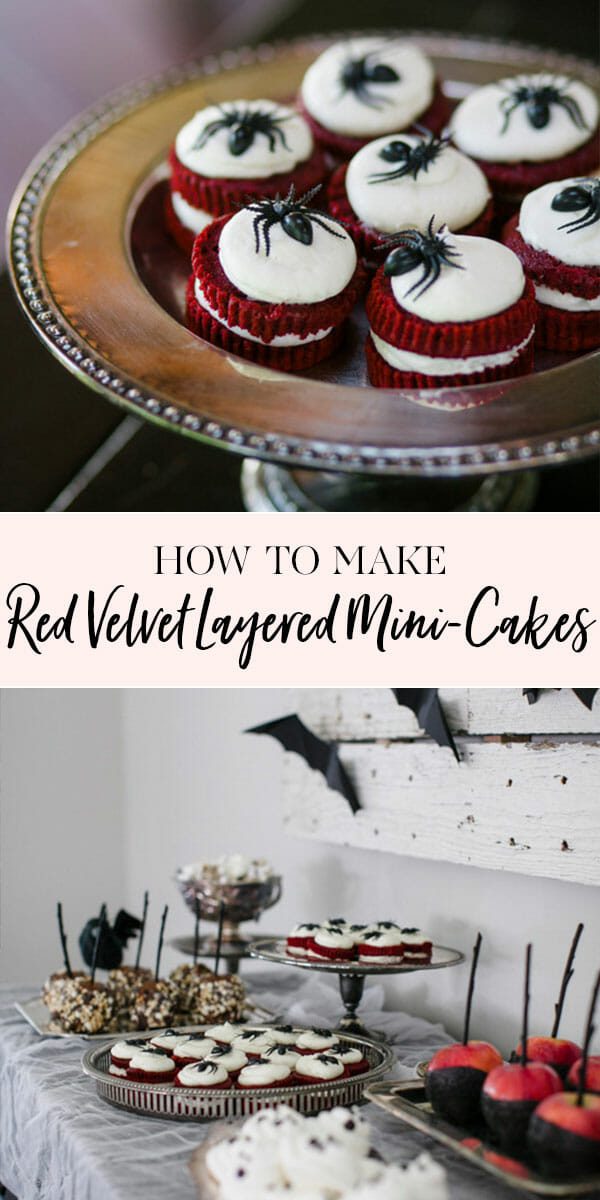
When it comes time to choose what treats you’ll make, keep it simple! Stick with seasonal classics such as caramel apples but give them a scary twist. I kept half of the caramel apples classic with caramel and nuts but dipped my second half in black chocolate and black sanding sugar. Instead of your typical wood dowel, I used black sticks, which gave them a poisonous feel.


Oreos are always a hit with kids, so dress yours up as mummies! These are so simple to make by dipping in white chocolate, adding eyeballs and then drizzling a “mummy wrap” over the top with remaining chocolate.

Caramel corn is a Halloween staple at our home but I wanted a more black and white look, so I made a ghostly blend using crushed oreos, skeleton black licorice pieces, drizzled chocolate and regular popcorn. The crows loved it!

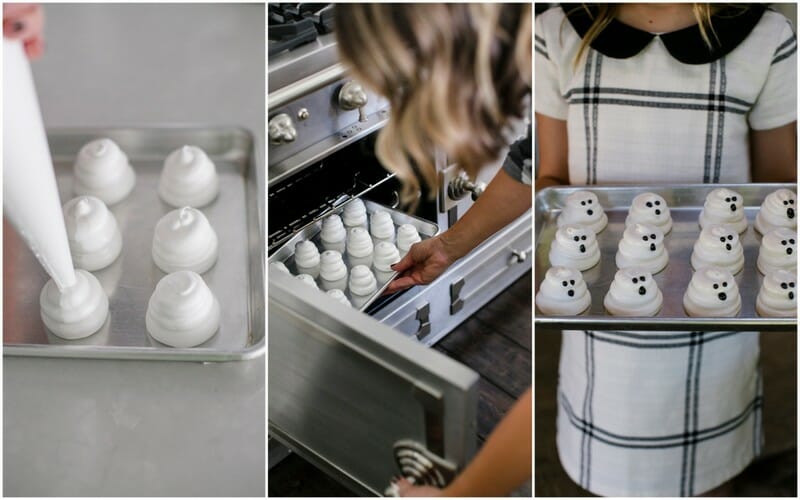
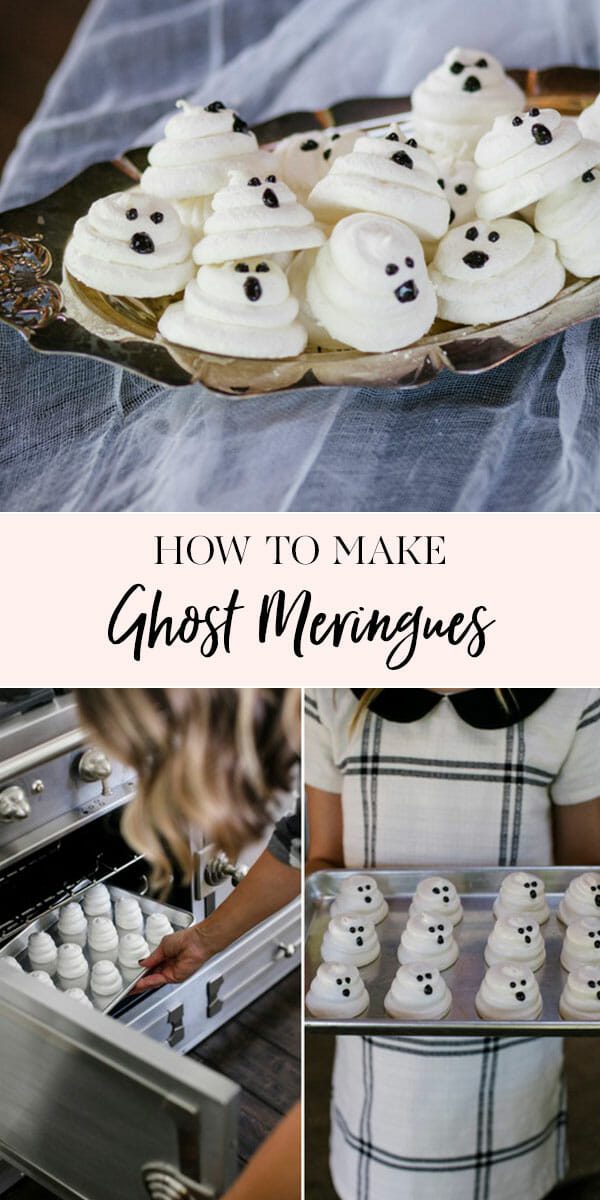
A Halloween table isn’t a Halloween table without a few ghosts. I made simple meringue ghosts and stacked them in a cool oval shaped tray. This is great recipe to try with kids, mine loved drawing the faces on!

Ghost Meringues
Makes about 15
Ingredients:
4 egg whites (at room temperature)
1 cup sugar
1/2 tsp cream of tarter
You will need:
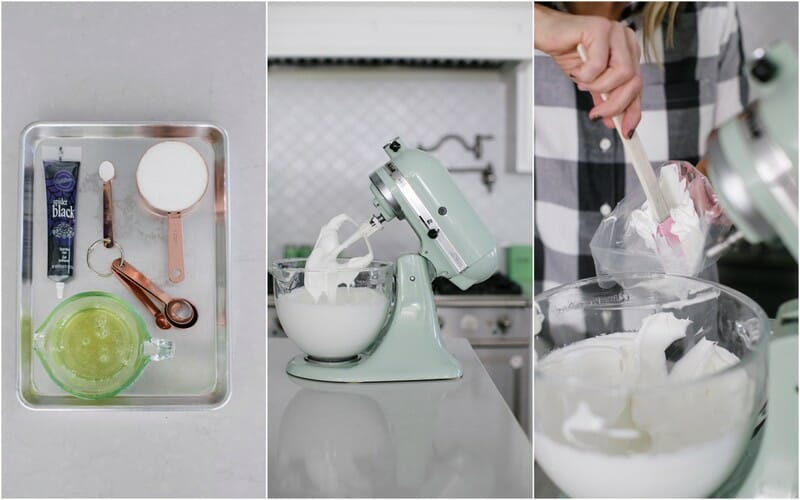
Black Food Gel
Disposable Pastry Bag
Directions:
1. Preheat oven to 225 degrees.
2. Beat egg whites and cream of tarter until frothy. Add sugar and beat until soft peaks form (about 5-6 minutes).
3. Fill disposable pastry bag with batter. Trim the tip of the pastry bag to create a 1/2″ from the bottom of the bag. Pipe batter onto cookie sheet holding the bag vertically while piping three blobs.
4. Bake for 40-50 minutes. Let cool completely.
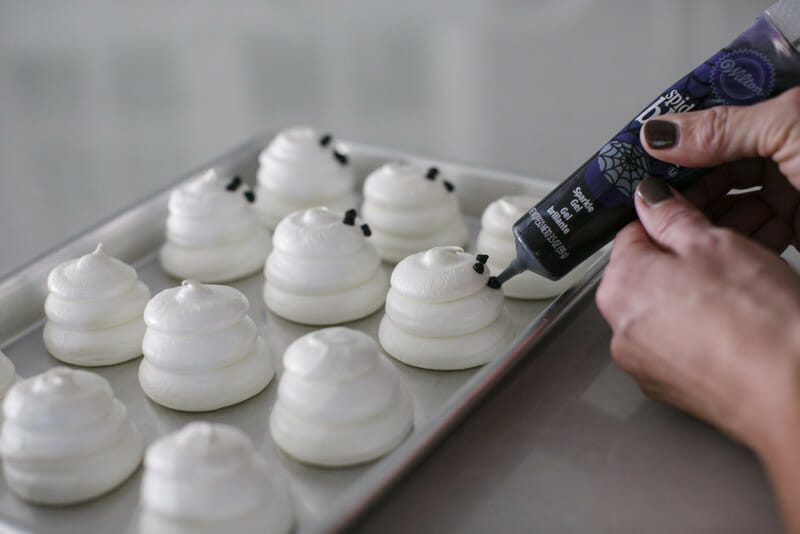
5. Draw on eyes and mouth using black food gel.
Ghost Meringues
Equipment
- Black Food Gel
- disposable pastry bag
Ingredients
- 4 egg whites at room temperature
- 1 cup sugar
- 1/2 tsp cream of tarter
Instructions
- Preheat oven to 225 degrees.
- Beat egg whites and cream of tarter until frothy. Add sugar and beat until soft peaks form (about 5-6 minutes).
- Fill disposable pastry bag with batter. Trim the tip of the pastry bag to create a 1/2" from the bottom of the bag. Pipe batter onto cookie sheet holding the bag vertically while piping three blobs.
- Bake for 40-50 minutes. Let cool completely.
- Draw on eyes and mouth using black food gel.
Notes
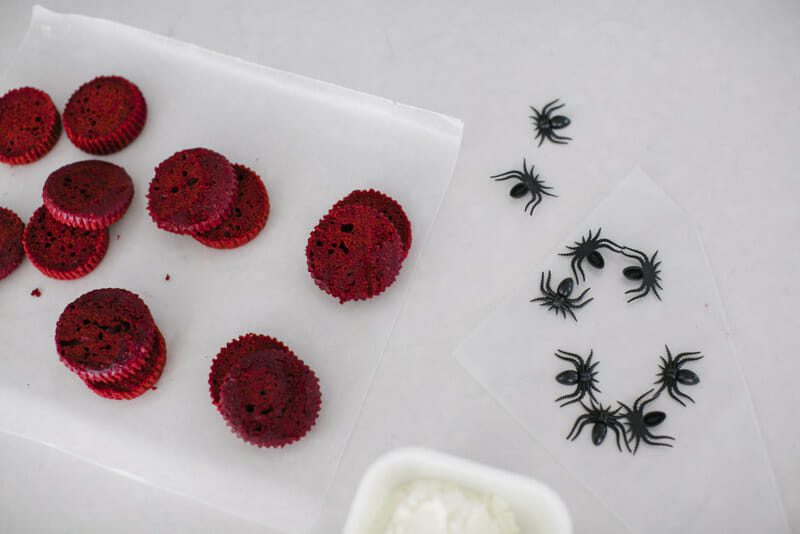
The last dessert I made for my Halloween table were mini red velvet layer cakes. These are quick and simple to make and a total crowd pleaser every time! You could make these with any flavor cake mix, but I thought the red velvet was a perfect pop of blood red on the table. Topped with plastic spiders and served in muffin cups, they’re the perfect amount of creepy!

Red Velvet Layered Mini Cakes
Makes 24 mini cakes
Cake Ingredients:
Red Velvet Cake Mix
Instant Chocolate Jell-O Pudding (3.4 oz box)
4 eggs
1 cup water
1/3 cup oil
Icing Ingredients
2 lb bag powdered sugar
1 cup margarine
1 cup crisco
3 tsp vanilla
3 tbls milk
You will need:
(2) cupcake or muffin pans
disposable pastry bag
Cake Directions:
1. Preheat oven to 350 degrees. In a large bowl or using an electric stand mixer fitted with a paddle attachment, beat the eggs, cake mix, pudding mix, water and oil on medium speed for 2 minutes or until well blended. Scrape the sides of the bowl and mix again until all ingredients are incorporated.
2. Line cupcake pans with liners. Fill each liner 2/3 full of batter.
3. Bake cupcakes for 18-20 minutes or until a toothpick inserted and cleanly removed. Remove the cupcake pans from oven, and let cool on a wire cooling rack for 15 minutes. Remove cupcakes and let cool completely.
*While your cupcakes are cooling, make your icing!
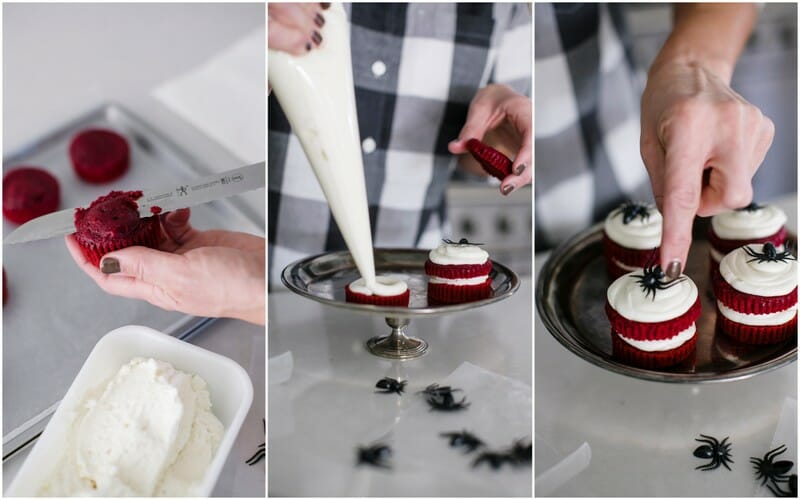
4. Remove cupcake liner from each cupcake. Using a serrated knife, cut the crowns off the top of each cupcake and then cut again through the middle of the cupcake, creating two even cake discs.
5. Fill disposable pastry bag with icing. Trim tip of bag 1/2″ from the end.
6. Holding the bag vertically, begin piping the frosting onto one half of each cupcake disc. Add top disc and repeat piping.
7. Set each mini layer cake in a muffin liner and top with a plastic spider.
Icing Directions:
1. Combine the margarine and Crisco in the bowl of an electric mixer; using a paddle attachment, beat on medium speed until smooth, about 2 minutes.
2. Add half of the powdered sugar and continue beating on low speed for an additional 2 minutes, or until the mixture is creamy, scraping the sides of the bowl with a rubber spatula as needed. Add the remaining powdered sugar, vanilla, and milk, and beat until the frosting is creamy and fluffy, about 2 minutes more. Beat on low speed until light and fluffy.
Red Velvet Layered Mini Cakes
Equipment
- (2) cupcake or muffin pans
- disposable pastry bag
Ingredients
- Cake Ingredients:
- Red Velvet Cake Mix
- Instant Chocolate Jell-O Pudding 3.4 oz box
- 4 eggs
- 1 cup water
- 1/3 cup oil
- Icing Ingredients
- 2 lb bag powdered sugar
- 1 cup margarine
- 1 cup crisco
- 3 tsp vanilla
- 3 tbls milk
Instructions
Cake Directions:
- Preheat oven to 350 degrees. In a large bowl or using an electric stand mixer fitted with a paddle attachment, beat the eggs, cake mix, pudding mix, water and oil on medium speed for 2 minutes or until well blended. Scrape the sides of the bowl and mix again until all ingredients are incorporated.
- Line cupcake pans with liners. Fill each liner 2/3 full of batter.
- Bake cupcakes for 18-20 minutes or until a toothpick inserted and cleanly removed. Remove the cupcake pans from oven, and let cool on a wire cooling rack for 15 minutes. Remove cupcakes and let cool completely.
- Remove cupcake liner from each cupcake. Using a serrated knife, cut the crowns off the top of each cupcake and then cut again through the middle of the cupcake, creating two even cake discs.
- Fill disposable pastry bag with icing. Trim tip of bag 1/2" from the end.
- Holding the bag vertically, begin piping the frosting onto one half of each cupcake disc. Add top disc and repeat piping.
- Set each mini layer cake in a muffin liner and top with a plastic spider.
Icing Directions:
- Combine the margarine and Crisco in the bowl of an electric mixer; using a paddle attachment, beat on medium speed until smooth, about 2 minutes.
- Add half of the powdered sugar and continue beating on low speed for an additional 2 minutes, or until the mixture is creamy, scraping the sides of the bowl with a rubber spatula as needed. Add the remaining powdered sugar, vanilla, and milk, and beat until the frosting is creamy and fluffy, about 2 minutes more. Beat on low speed until light and fluffy.
Notes
For other chilling Halloween Party ideas, check out our Halloween Pinterest board and visit our other party planners Sugar & Charm, Studio DIY and Poppy Talk!
Pin this idea for later!

Photography by Laura Marchbanks
This is so cute Jenny! Reminds me of the Haunted House at Disneyland. Great finds at Value Village!