My Little Pony Cutie Mark Fondant Tutorial
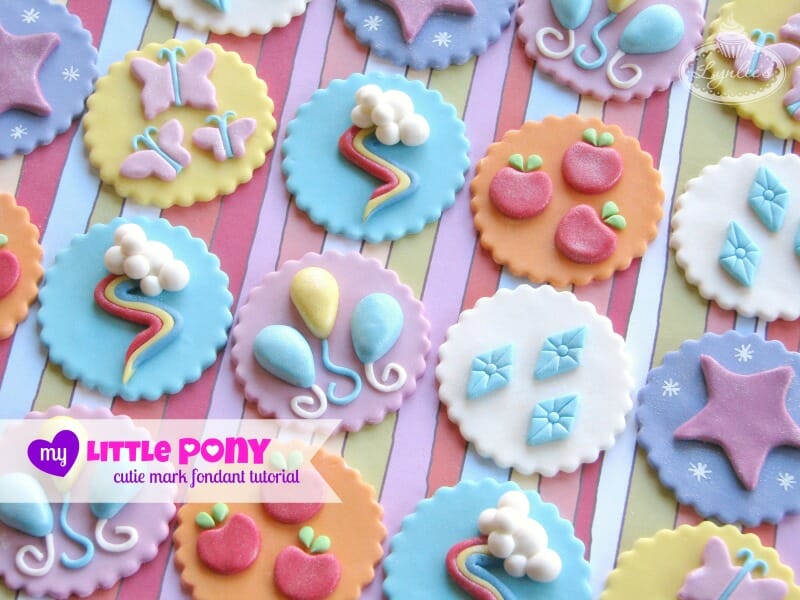
If you loved the amazing cutie mark cupcake toppers from Ally’s Pony Party, you are in luck!! We have Lynlee of Lynlee’s Petite Treats here giving us step by step instructions on making your own cutie mark toppers!
Materials Needed:
Red, light green, orange, pink, light blue, yellow,
blue, white, magenta and purple fondant
Water/edible glue and brush
Vegetable shortening
Fondant rolling pin with 1/8″ guide rings
1/4″ wooden dowels
2 ¼” round scalloped/fluted cutter
Round decorating tips #5, #7, #12
Precision knife
Small circle cutter
Medium heart cutter
Miniature and small butterfly cutters
Small oval cutter
Small diamond cutter
White soft gel paste and toothpick
White shimmer dust and brush
Applejack Cutie Mark tutorial
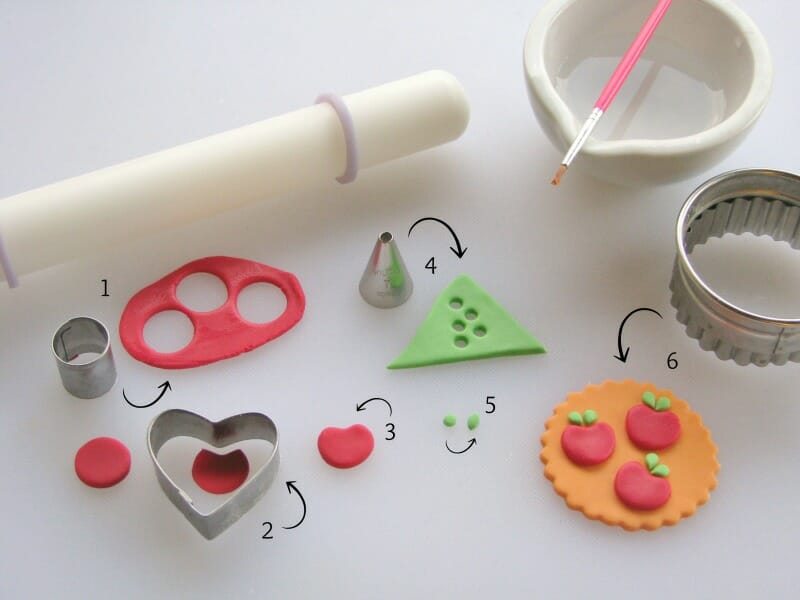
1. Roll out red fondant with the rolling pin and 1/8″ guide rings and cut out three circles with the small circle cutter.
2. Trim off the top of each circle with the top of the medium heart cutter.
3. Dip your fingers in a tiny bit of shortening and round out the two tips you’ve created at the top of the circle to resemble an apple. Repeat with the remaining circles.
4. Roll out light green fondant with the rolling pin and 1/8″ guide rings. Punch out six little circles with round decorating tip #7.
5. Shape each of the little light green circles into ovals to form leaves.
6. Roll out orange fondant with the rolling pin and 1/8″ guide rings and cut out a circle with the 2 ¼” round scalloped cutter. Glue the apples and leaves to the orange fondant. Allow to dry thoroughly. Lightly brush white shimmer dust over the topper.
Fluttershy Cutie Mark tutorial
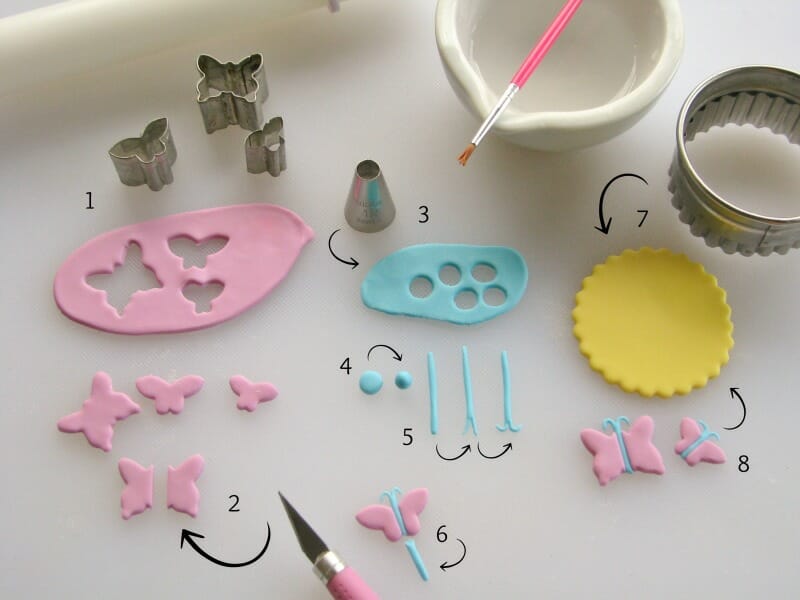
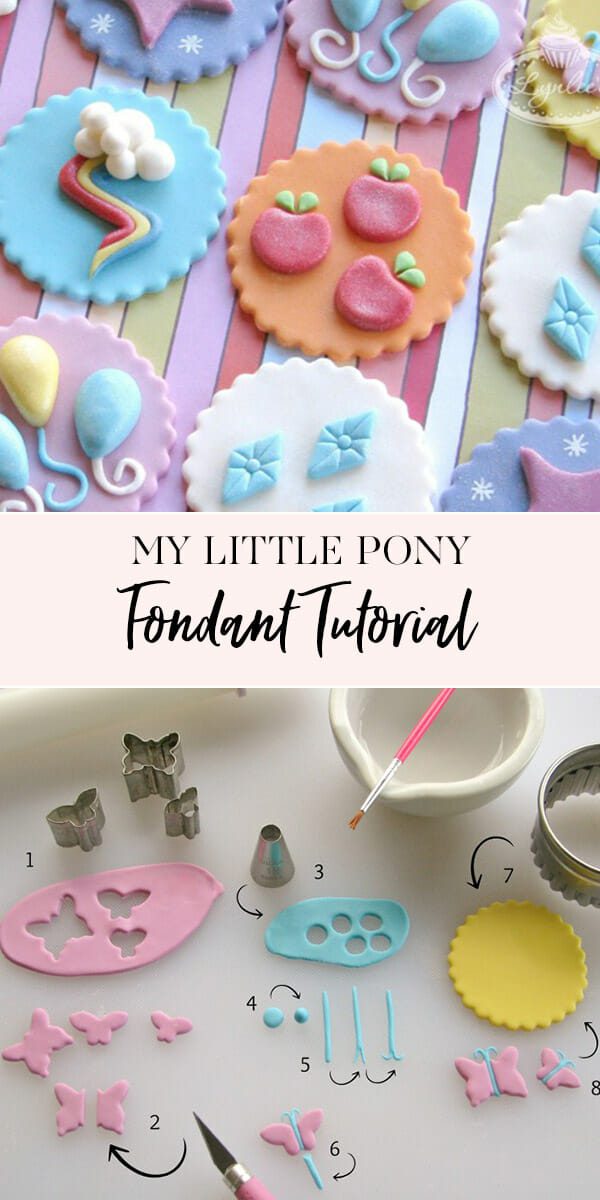
1. Roll out pink fondant with the rolling pin and 1/8″ guide rings and cut out three butterfly shapes with the various cutters.
2. With the precision knife, cut each butterfly in half lengthwise.
3. Roll out light blue fondant with the rolling pin and 1/8″ guide rings. Cut out three circles with round decorating tip #12.
4. Roll each of the light blue circles into balls.
5. Roll out each light blue ball on your work surface into a long snake-like shape. With the precision knife, split the very ends to form antennae and twist them downward.
6. Glue the light blue fondant in between the pink butterfly wings and trim off the excess. Repeat with the remaining two fondant pieces.
7. Roll out yellow fondant with the rolling pin and 1/8″ guide rings and cut out a circle with the 2 ¼” round scalloped cutter.
8. Glue the three butterflies to the yellow fondant circle. Allow to dry thoroughly. Lightly brush white shimmer dust over the topper.
Pinkie Pie Cutie Mark tutorial
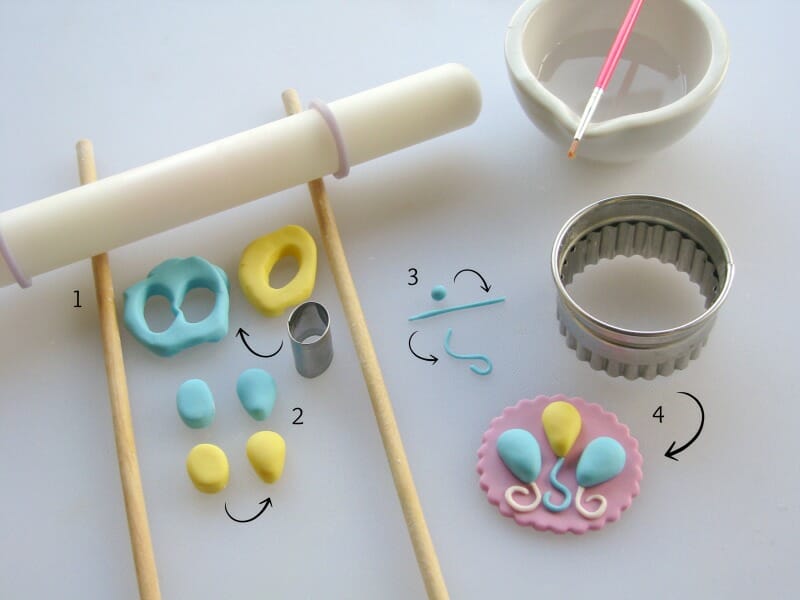
1. Roll out light blue and yellow fondant thick wit h the rolling pin and 1/4″ wooden dowels as guides. Cut out two light blue ovals and one yellow oval with the small oval cutter.
2. Dip your fingers in a bit of vegetable shortening, then round out the edges of the ovals and shape them into balloons by narrowing one end.
3. Roll a little bit of light blue fondant into a b all, then roll it out into a long snake-like shape on your work surface. Shape it to form the balloon’s string and loop it a bit at the end. Allow it to dry a bit to hold its shape. Repeat the steps with white fondant to create two additional strings.
4. Roll out pink fondant with the rolling pin and 1/8″ guide rings and cut out a circle with the 2 ¼” round scalloped cutter. Glue the balloons and strings to the bottom topper and allow to dry thoroughly. Lightly brush white shimmer dust over the topper.
Rainbow Dash Cutie Mark tutorial
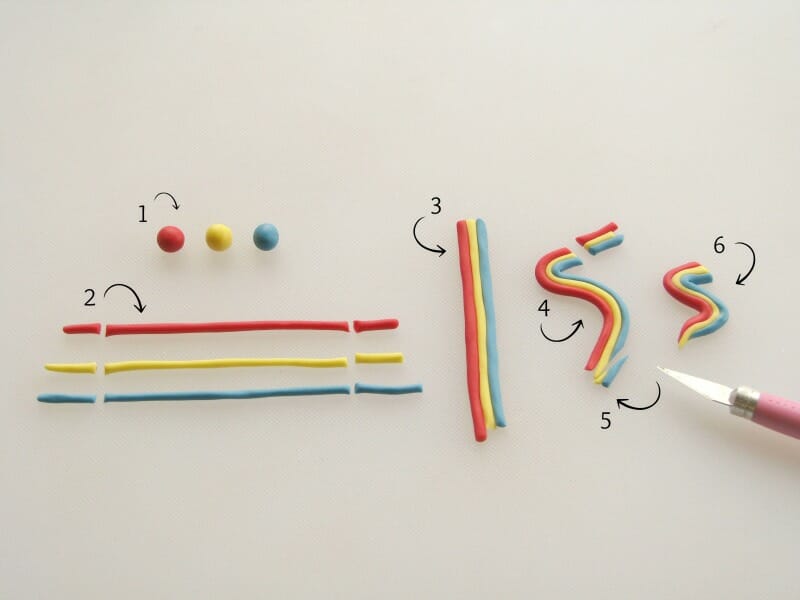
1. Roll red, yellow and blue fondant into balls.
2. Roll each color of fondant out on your work surface into snake-like shapes. Trim them to approximately 3″ long.
3. Lay the colors on your work surface (red, yellow, blue) and gently press them together.
4. Shape the strip of all three colors into a flash “S” shape with your fingers (apply a bit of vegetable shortening if necessary for more elasticity).
5. Trim the top off with the precision knife, then trim the bottom, tapering it off like a lightning bolt.
6. Make sure the fondant shape is as desired and flatten the top a bit with your fingers to later fit the clouds.
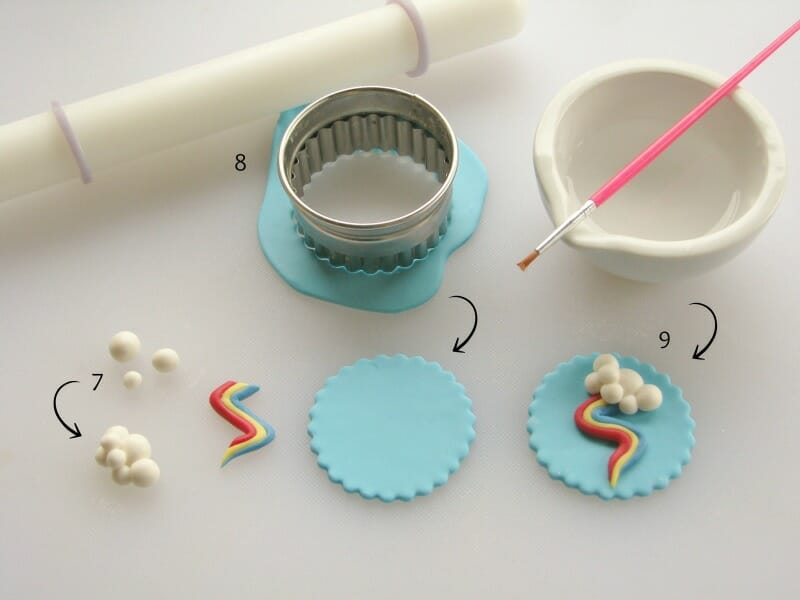
7. Roll several pieces of white fondant into various-sized balls (approximately 7-8). Arrange and layer them to resemble a cloud (an oval shaped cloud) and glue the balls together when happy with the arrangement.
8. Roll out light blue fondant with the rolling pin and 1/8″ guide rings and cut out a circle with the 2¼” round scalloped cutter.
9. Glue the rainbow, then the cloud over it to the light blue bottom topper. Allow to dry thoroughly. Lightly brush white shimmer dust over the topper.
Rarity Cutie Mark tutorial
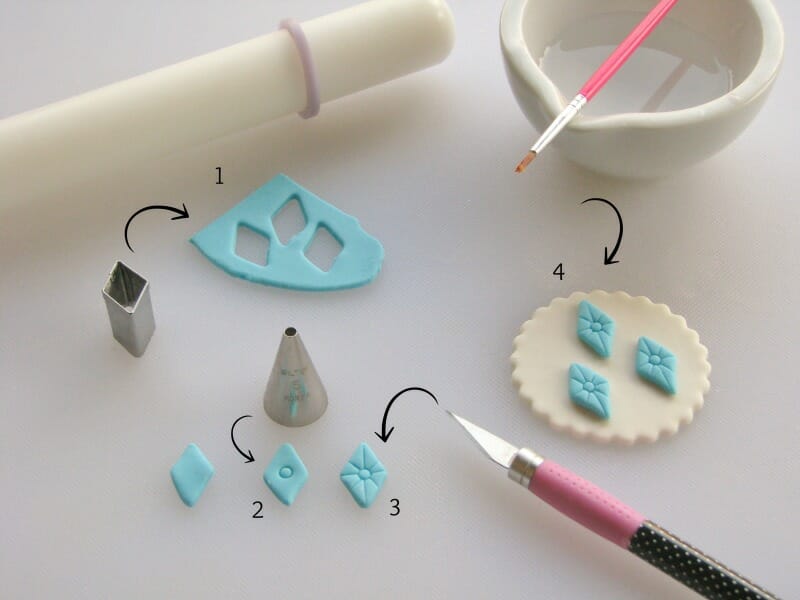
1. Roll out light blue fondant with the rolling pin and 1/8″ guide rings. Cut out three small diamond shapes with the cutter. If you don’t have a diamond cutter, utilize a square and trim it to resemble a diamond with the precision knife.
2. Utilize round decorating tip #5 to indent the very center of one of the fondant diamonds. Repeat with the two remaining shapes.
3. Utilize the precision knife to make linear indentations from the edges of the diamond shapes up to the center circles. Make sure not to press to hard or you will cut all the way through the fondant.
4. Roll out white fondant with the rolling pin and 1/8″ guide rings and cut out a circle with the 2 ¼” round scalloped cutter. Glue the diamonds to the white topper and allow to dry thoroughly. Lightly brush white shimmer dust over the topper.
Twilight Sparkle Cutie Mark tutorial
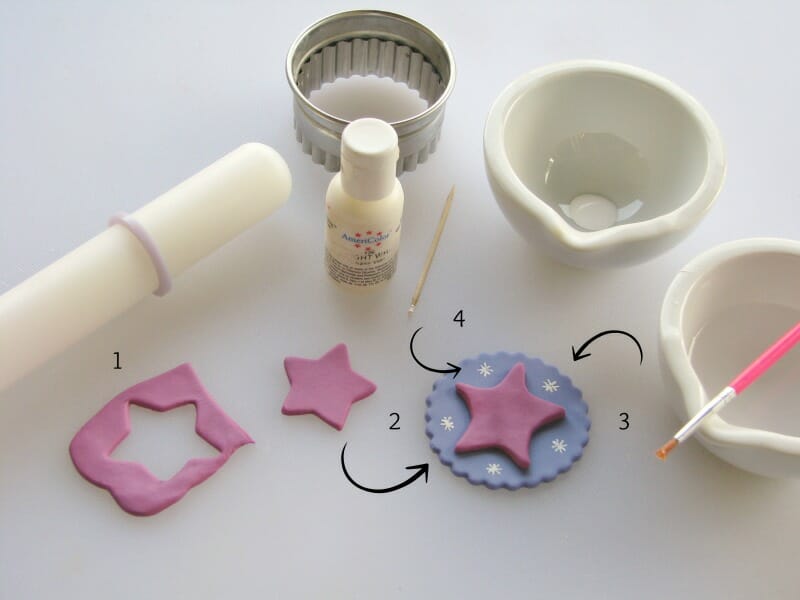
1. Roll out magenta fondant with the rolling pin and 1/8″ guide rings. Cut out a star with the medium-sized cutter.
2. Apply vegetable shortening to your fingers and pull the tips of the fondant star to lengthen them out a bit.
3. Roll out purple fondant with the rolling pin and 1/8″ guide rings and cut out a circle with the 2 ¼”round scalloped cutter. Glue the fondant star to the center and allow to dry thoroughly.
4. Once dry, dip the toothpick in white soft gel paste and draw little stars on the purple.
For more fabulous fondant ideas and tutorials check out Lynlee’s book Sweet & Unique Cupcake Toppers! It’s filled with over 80 creative fondant tutorials, tips and tricks!
Thanks Lynlee for this wonderful step-by-step tutorial!
Pin this idea for later!
Oh!!!! I love it! I would try it!
Kisses from Paris 🙂
I wanted to ask how long are these fondant toppers good for? I want to make these in advance and not the night before. Will they last for a 2 to 3 days?
And is it possible to also tell me what fondant recipe was used for these cupcake toppers?
Thank you.
This is awesome! Thank you 🙂