How to Make Marbled Cake Pops
This post was sponsored by JOANN. All opinions are my own.

If there were ever a treat that was made for all ages, it’s a cake pop. They might appear to be geared towards kids, but I’ve been making these for years and have seen more adults than I can count grab them before the kids can reach them!
What’s a cake pop? It’s a ball of cake, smashed and mixed with icing, then coated with chocolate and/or candy melts and attached to a stick to resemble a lollipop. The best part about cake pops is you can make them in a bazillion different flavors and color combinations. Love chocolate? Make chocolate! Love red velvet? Make red velvet! The varieties and flavor combinations are endless. My favorite flavor is cookies and cream, made super easy with a box of chocolate cake mix and Oreo cookies. You can get the recipe HERE.
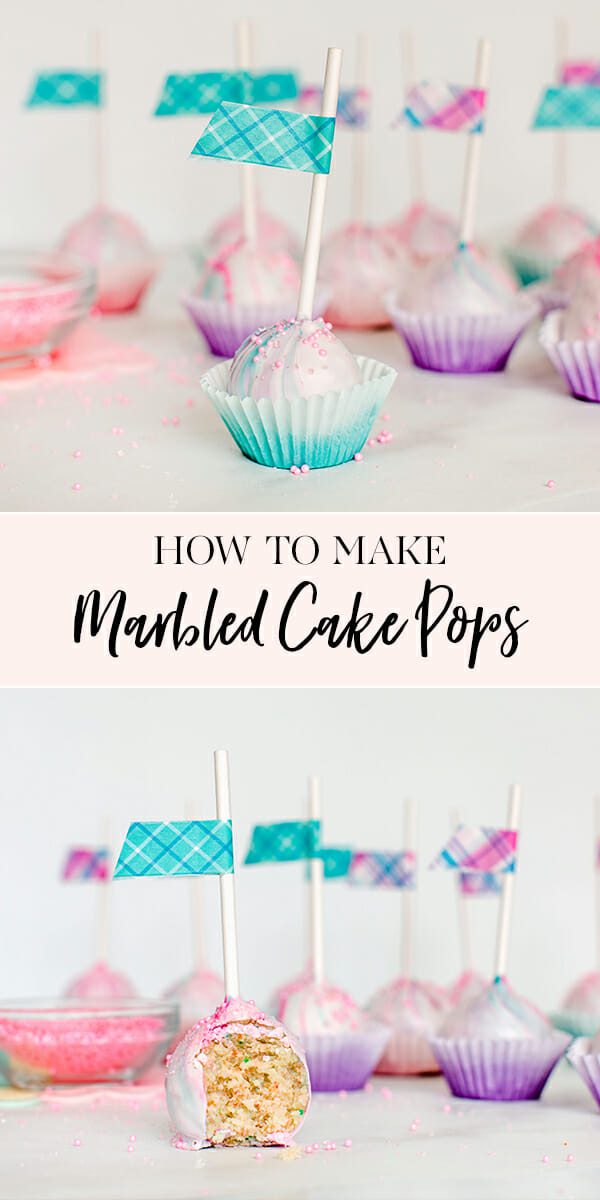
I’ve made cake pops in every color possible but my favorite way to make them is to marble them! It’s so much fun to mix colors and create something so whimsical. When you use my marble technique, there are no two alike! With just a few supplies from JOANN, you can make these no-fail marble cake pops in your favorite color combination.

You will need:
Cookie Scoop
Ingredients:
Crumbled cake (Any boxed mix works great or you can use your favorite cake recipe)
About 3/4 cup icing (get my recipe HERE)

Directions:
1. Mash up cake and place in a large bowl. Using an electric stand mixer fitted with a paddle attachment, mix the cake, and 1/2 to 3/4 cup buttercream frosting on medium sped until well blended and the mixture can be formed into a ball.

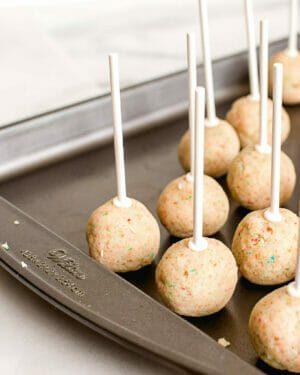
2. Using a small cookie scoop, scoop and roll mixture into balls and place on a cookie sheet. (Use cookie scoop for evenly sized balls). Refrigerate for 30-60 minutes or until firm.

2. Melt white candy melts in a candy melting pot or a microwave safe bowl for 30 second increments for about 2 1/2 minutes at 40% power, stirring as needed until smooth. Melt 2nd (and 3rd if desired) candy melt colors in a separate bowl. Set aside.

3. Remove the pops from the refrigerator. Dip each lollipop stick 1/4 inch into the melted candy. Insert the sticks into all the cake balls. (The melted candy will adhere the lollipop sticks to the cake balls to prevent them from falling off the sticks when dipping).

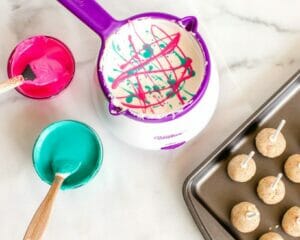
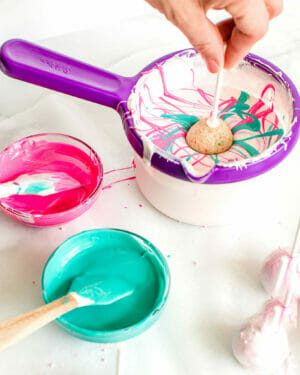
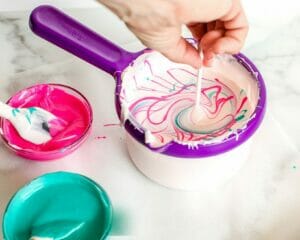
4. Drizzle a small amount of colored candy melts into the white melted candy. You can add as many colors as you’d like or keep it simple with just one color with the white.

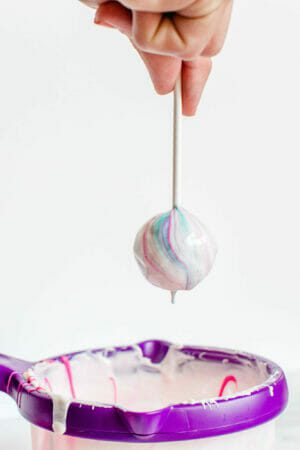
4. Dip entire cake ball down into melted candy. When completely submerged into the melted candy, twist lollipop stick as you pull up, to create a marbled look on the cake ball. Hold pop over melted candy and gently shake wrist to allow excess melted candy to drip off. When pop is no longer dripping, transfer to a sheet of parchment or waxed paper to dry. If you prefer your pop to be perfectly round, you can stand the pops in a sheet of styrofoam to dry.


5. While the candy melts are still tacky, sprinkle cake pops as desired.
Extra Credit:
You’ll likely have left-over candy melts in your bowl or melting pot. I like to use all of my ingredients up, so I usually make a fun bark or dip another cookie or treat into the candy. It’s an easy way to create another dessert and eliminate waste. I had extra Oreo cookies, so I dipped a bunch into the mixture and then with the remaining, I poured it onto a sheet pan (lined with parchment) and sprinkled an assortment of candies and sprinkles over the top. Pretzels, potato chips, store bought cookies and fruit are great to dip!

Decorate your cake pops!
After the cake pops have fully dried, I love to use colorful and patterned washi tape to create one last extra detail. Simply take about 2 inches of washi tape and wrap it around the lollipop stick. Use scissors to trim the edge. Finish the look by placing each cake pop into a miniature cupcake liner.


If you used the excess melted candy to make a bark, after it’s fully dried, break it up into a variety of pieces and display on a tiered cake plate or tray. Mini pieces of bark make really cute cupcake toppers as well!

Marbled Cake Pops
Equipment
- Candy Melts
- Lollipop Sticks
- Sprinkles
- Candy Melter
- Washi Tape
- Spatulas
Ingredients
- Crumbled cake Any boxed mix works great or you can use your favorite cake recipe
- About 3/4 cup icing get my recipe HERE
Instructions
- Mash up cake and place in a large bowl. Using an electric stand mixer fitted with a paddle attachment, mix the cake, and 1/2 to 3/4 cup buttercream frosting on medium sped until well blended and the mixture can be formed into a ball.

- Using a small cookie scoop, scoop and roll mixture into balls and place on a cookie sheet. (Use cookie scoop for evenly sized balls). Refrigerate for 30-60 minutes or until firm.

- Melt white candy melts in a candy melting pot or a microwave safe bowl for 30 second increments for about 2 1/2 minutes at 40% power, stirring as needed until smooth. Melt 2nd (and 3rd if desired) candy melt colors in a separate bowl. Set aside.
- Remove the pops from the refrigerator. Dip each lollipop stick 1/4 inch into the melted candy. Insert the sticks into all the cake balls. (The melted candy will adhere the lollipop sticks to the cake balls to prevent them from falling off the sticks when dipping).
- Drizzle a small amount of colored candy melts into the white melted candy. You can add as many colors as you'd like or keep it simple with just one color with the white.
- Dip entire cake ball down into melted candy. When completely submerged into the melted candy, twist lollipop stick as you pull up, to create a marbled look on the cake ball. Hold pop over melted candy and gently shake wrist to allow excess melted candy to drip off. When pop is no longer dripping, transfer to a sheet of parchment or waxed paper to dry. If you prefer your pop to be perfectly round, you can stand the pops in a sheet of styrofoam to dry.
- While the candy melts are still tacky, sprinkle cake pops as desired.
- Extra Credit:
- You'll likely have left-over candy melts in your bowl or melting pot. I like to use all of my ingredients up, so I usually make a fun bark or dip another cookie or treat into the candy. It's an easy way to create another dessert and eliminate waste. I had extra Oreo cookies, so I dipped a bunch into the mixture and then with the remaining, I poured it onto a sheet pan (lined with parchment) and sprinkled an assortment of candies and sprinkles over the top. Pretzels, potato chips, store bought cookies and fruit are great to dip!

- Decorate your cake pops!
- After the cake pops have fully dried, I love to use colorful and patterned washi tape to create one last extra detail. Simply take about 2 inches of washi tape and wrap it around the lollipop stick. Use scissors to trim the edge. Finish the look by placing each cake pop into a miniature cupcake liner.
Would love to see your marbled cake pops! Tag me in your creations on social media by using the hashtag #jennycookies!
Pin this idea for later!
Photos by Kelly Clare
<span style=”font-size: 8pt;”>THIS IS A SPONSORED POST. JENNY COOKIES HAS RECEIVED PAYMENT, TRADE AND/OR PRODUCTS IN EXCHANGE FOR PROMOTING, HOWEVER ALL OPINIONS STATED ARE MY OWN AND I ONLY PROMOTE PRODUCTS/COMPANIES I LOVE.</span>
I love your website. Your creations are beautiful!
I would love your cake pops recipe.