DIY Rainbow Surprise Cake
This post was sponsored by JOANN. All opinions are my own.
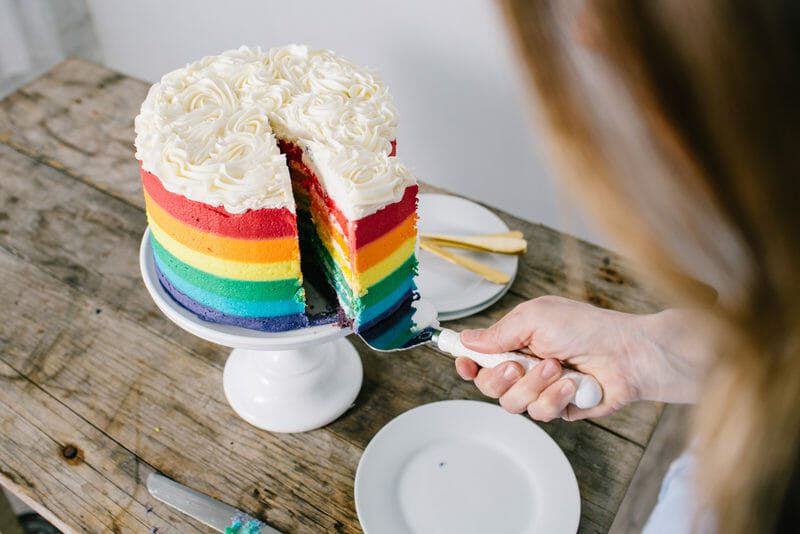
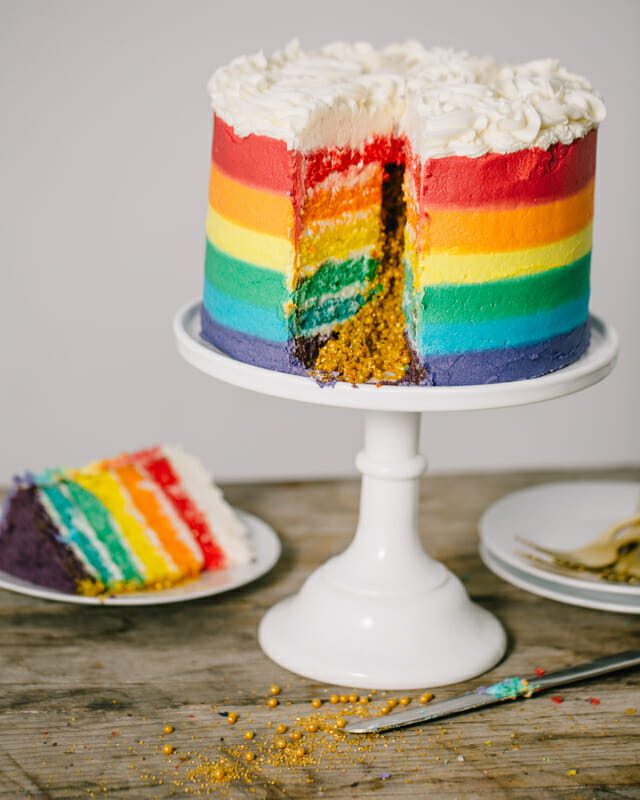
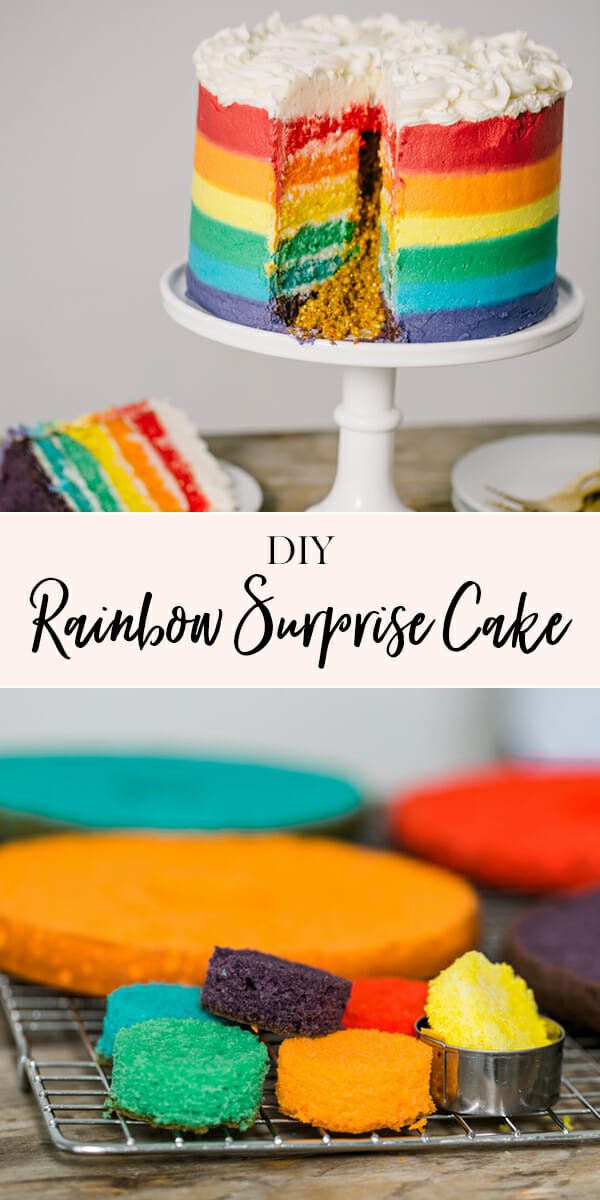
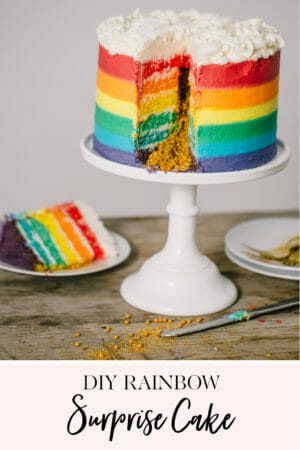
Skip the green beer this St Patrick’s Day and treat your friends and family to a rainbow surprise cake! Underneath clouds of ruffled buttercream icing hides a gold treasure.

You can use your favorite white or vanilla cake recipe, or save a little time with a doctored cake recipe. I’ve listed mine below!
What you’ll need:
• (6) 8” cake pans OR (2) Wilton Easy Layers pan sets
• Wilton Color Right System
• Disposable Decorating Bags
• Cake Turn Table
• Cake Cooling Racks
• (6) 1A Decorating Tips
• Large Star Decorating Tip
• Angled Cake Spatula
• Small round cookie cutter
• 8” cake board
• Gold Sprinkles (available in-stores)
• Gold Sanding Sugar (available in-stores)
• Gold Pearls
• Wilton Bake Easy Spray
• Dritz Ezy-Hem Gauge
Rainbow Cake:
• (3) boxes vanilla cake mix
• 3 cups water
• 1 cup oil
• 2 boxes Vanilla Instant pudding
• 12 eggs
1. Preheat oven to 350 degrees. Coat 8-inch baking pans with cooking spray or grease and flour the pans, tapping out excess flour. Set the prepared pans aside.
2. Using an electric mixer with a paddle attachment, beat the cake mix, pudding, mix, water, oil and eggs on medium speed for 2-3 minutes or until well blended. Scrape the sides of the bowl and mix again until all the ingredients are incorporated.
3. Pour equal amounts of batter into 6 cereal sized bowls. Using Wilton Color Right system, color each bowl a color of the rainbow.
4. Pour batter into prepared pans, filling each approximately 3/4 full.
5. Place pans in the preheated oven. Bake cakes for 30-35 minutes, or until a toothpick inserted into the center comes out clean. Depending on the size of the oven, you may need to bake this cake in two batches.
6. Remove the pans from the oven and place on wire cooling racks for 25-30 minutes. Run a knife around the edges of the cakes, flip the pans over and gently extract the cakes. Return the cakes to the wire racks and finish cooling completely.
7. While the cakes are cooling, make a batch of buttercream frosting. Reserve 1/2 of the frosting into a separate bowl for filling and crumb coat. Separate remaining frosting into 6 bowls. Using Wilton Color Right System, color each bowl of frosting a color of the rainbow (red, orange, yellow, green, blue, purple).
Buttercream Icing:
• 2 cups margarine
• 2 cups Crisco
• 4lbs powdered sugar
• 4 tsp clear vanilla
• 6 tbsp milk
Directions:
1. Combine the margarine and Crisco in an electric mixer fitted with a paddle attachment. Beat on medium until smooth, about 2 minutes.
2. Add half of the powdered sugar and mix on low speed about 2 minutes or until mixture is creamy, scraping the sides of the bowl with a rubber spatula as needed. Add remaining powdered sugar, vanilla and milk, and beat until frosting is creamy and fluffy about 2 minutes.
Assembling the Cake:
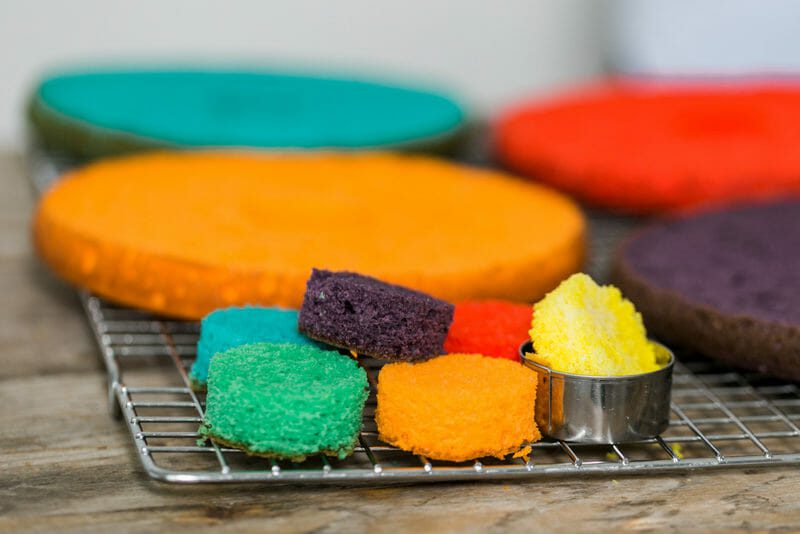
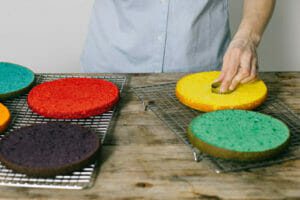
1. Using a serrated knife, remove crowns of each cake. With a small, round cookie cutter, remove one circle center from the middle of each cake. Repeat with each cake layer.

 2.
2.
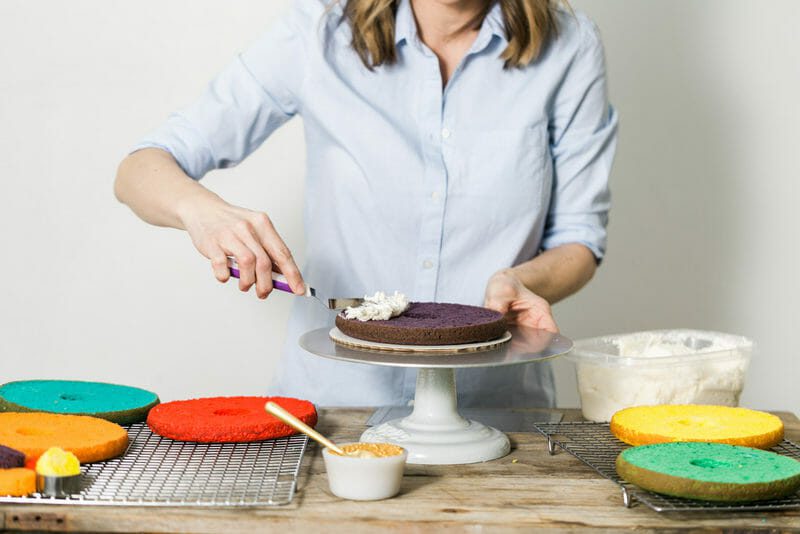
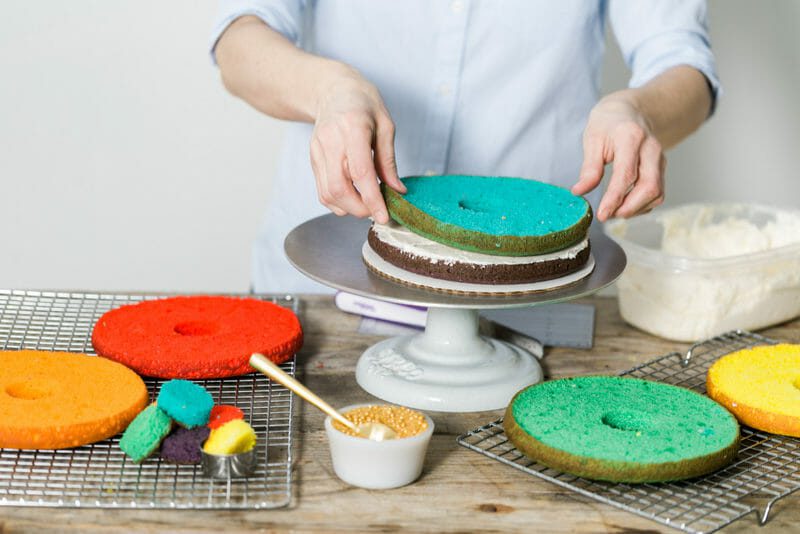
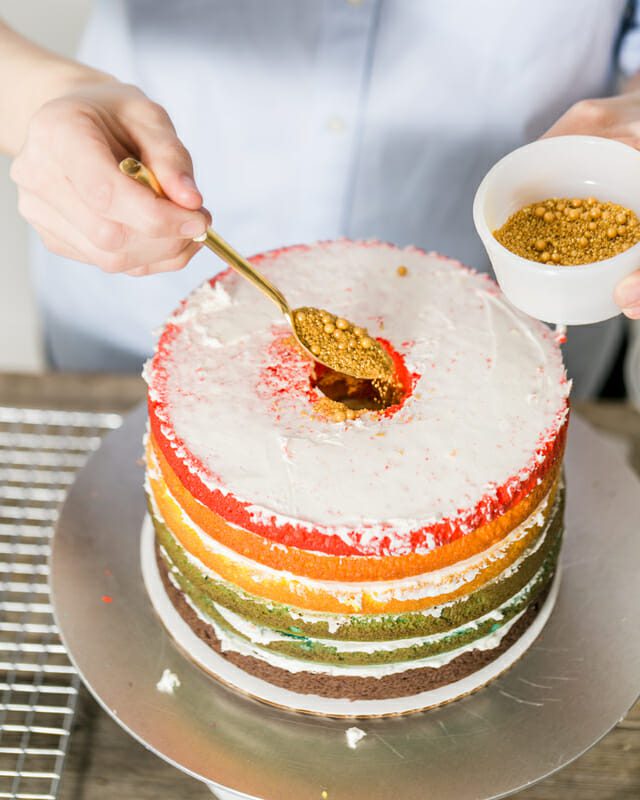
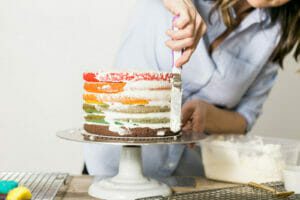
Place an 8” cake board onto a cake turntable. Place the purple cake layer on board. Spread a thin layer of icing on top of cake using an angled cake spatula. Stack blue layer on top. Spread a thin layer of icing across the top of the blue cake. Repeat steps with green, yellow, orange and red layers. After final layer is stacked, pour gold sprinkle mixture (made up of gold sanding sugar, crystals, and pearls) into the hole in the center of the cake.
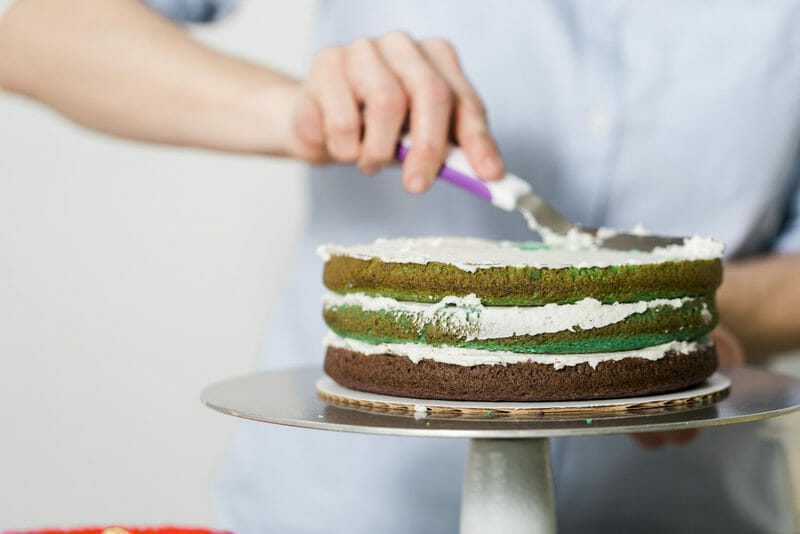
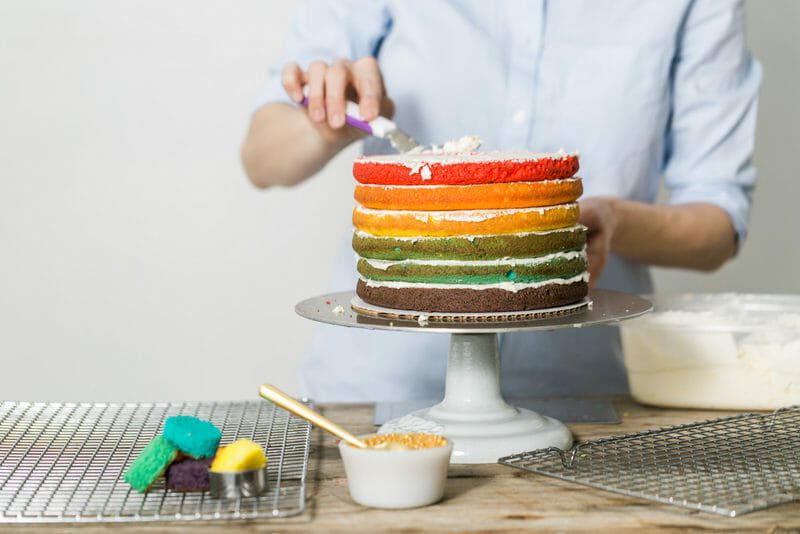
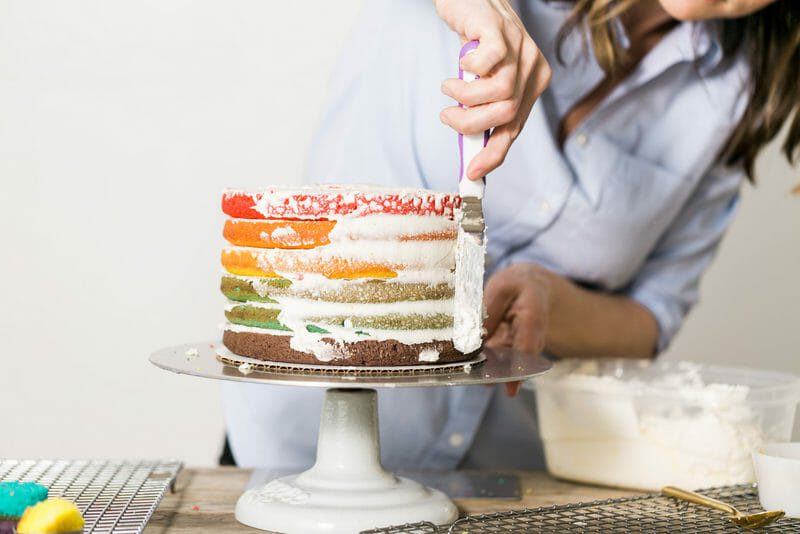

3. Use angled cake spatula to cover the cake completely with a very thin layer of white frosting (or crumb coat) to help reduce the amount of crumbs in the final coat of icing. Set the cake aside for 20 minutes to “crust”.
4. Fill 6 Wilton decorating bags each fitted with a 1A decorating tip with rainbow colored frostings. Fill 1 bag fitted with a tip with white icing.
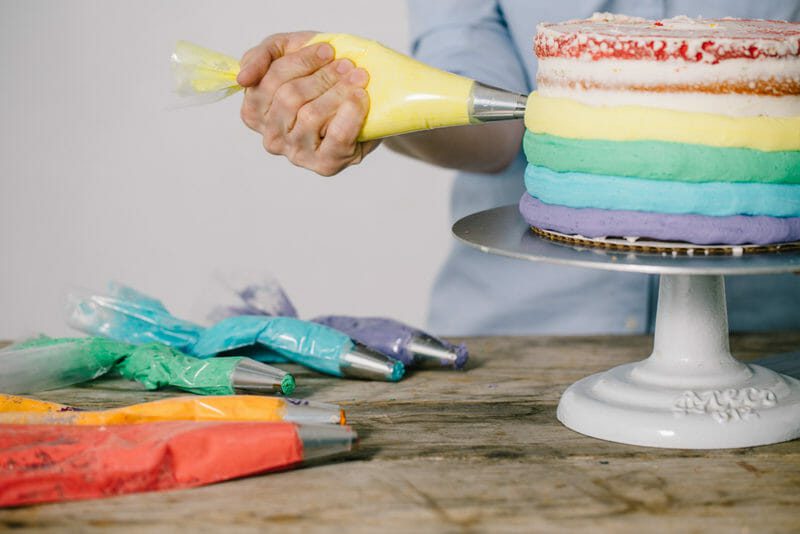
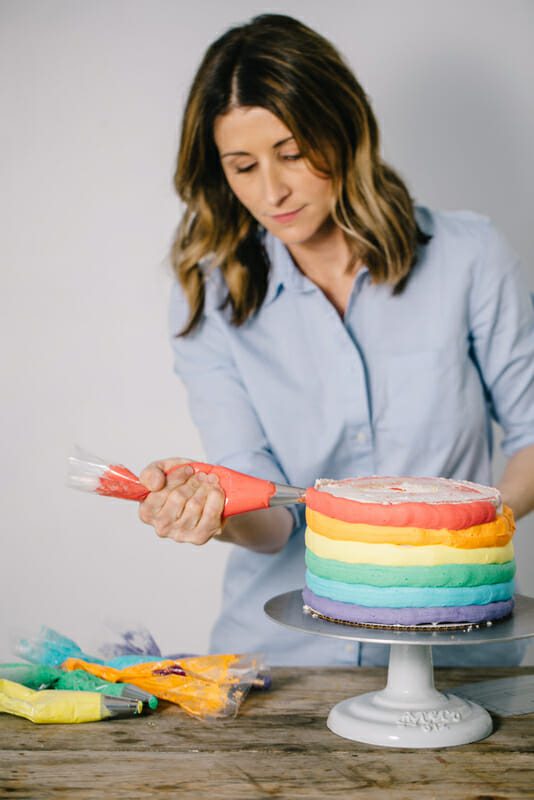
5. Starting with the purple icing bag held in a horizontal position, begin applying purple icing around bottom of the cake with even pressure while turning cake table with opposite hand. Repeat layer with blue icing and continue through remaining rainbow colors.

 6.
6.
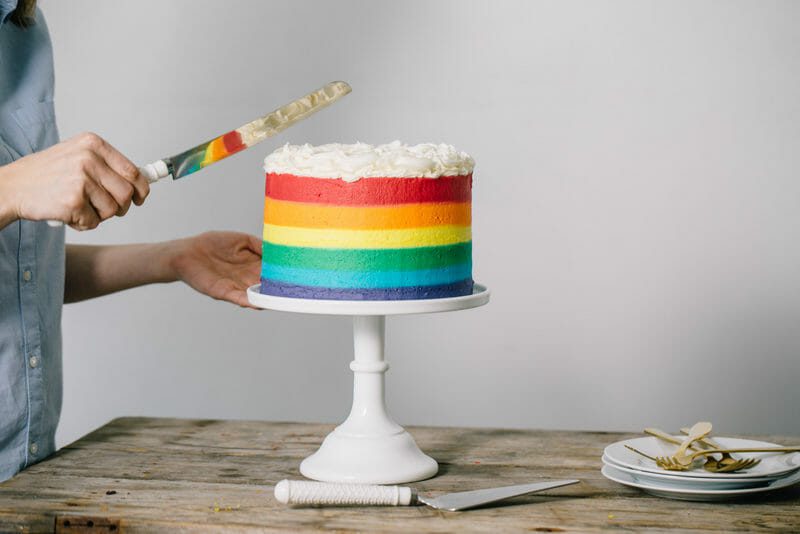
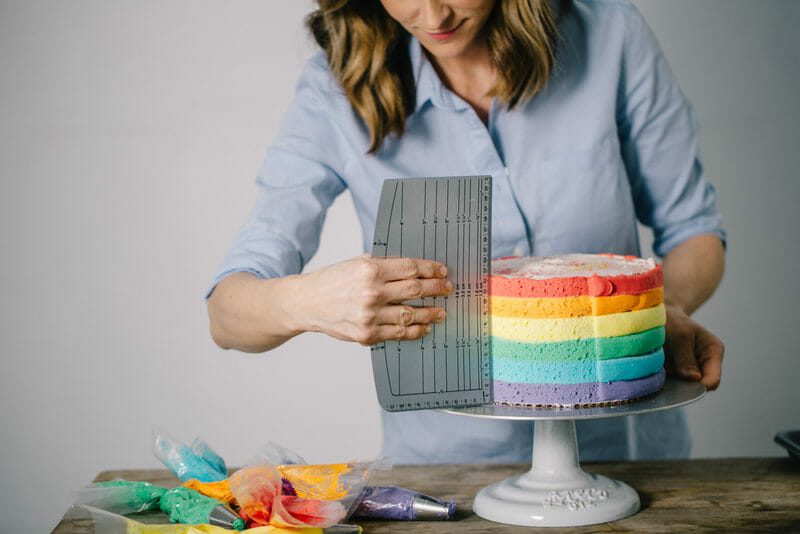
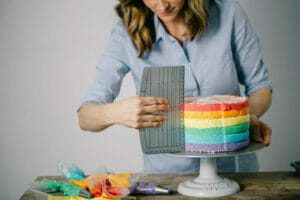
Using a Dritz Hem Gauge (my favorite cake smoothing tool), begin to scrape the side of the cake as you rotate the turntable. Scrape excess frosting off and repeat until cake is smooth.
 7.
7.
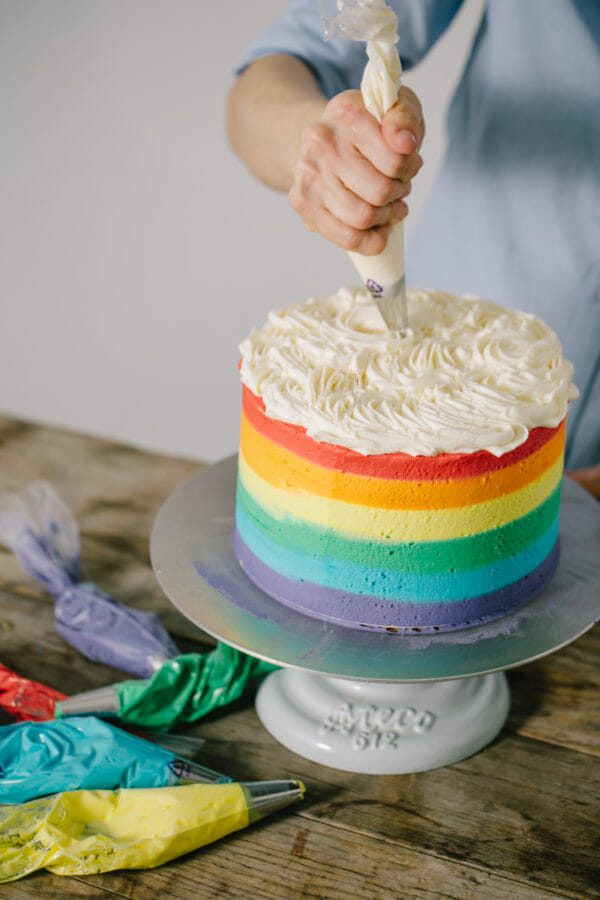
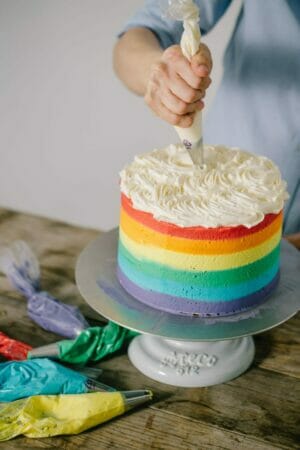
Decorate the top of the cake with white icing bag fitted with the large star tip. Swirl circular motions around the top of the cake to create a cloud look. Continue until the entire top surface of the cake is covered.
Since the cake is supported with a cake board base, you can move the cake to any pedestal or cake stand of your choice! Place cake on something special for cutting and prepare your guests for a fun surprise of gold in the middle. Happy St Patrick’s Day!
DIY Rainbow Surprise Recipe
Equipment
- (6) 8” cake pans OR (2) Wilton Easy Layers pan sets
- Wilton Color Right System
- Disposable Decorating bags
- Cake Cooling Racks
- (6) 1A Decorating Tips
- Large Star Decorating Tip
- Angled Cake Spatula
- Small round cookie cutter
- 8” cake board
- Gold Sprinkles (available in-stores)
- Gold Sanding Sugar (available in-stores)
- Gold Pearls
- Wilton Bake Easy Spray
- Dritz Ezy-Hem Gauge
Ingredients
Rainbow Cake:
- 3 boxes vanilla cake mix
- 3 cups water
- 1 cup oil
- 2 boxes Vanilla Instant pudding
- 12 eggs
Buttercream Icing:
- 2 cups margarine
- 2 cups Crisco
- 4 lbs powdered sugar
- 4 tsp clear vanilla
- 6 tbsp milk
Instructions
- Preheat oven to 350 degrees. Coat 8-inch baking pans with cooking spray or grease and flour the pans, tapping out excess flour. Set the prepared pans aside.
- Using an electric mixer with a paddle attachment, beat the cake mix, pudding, mix, water, oil and eggs on medium speed for 2-3 minutes or until well blended. Scrape the sides of the bowl and mix again until all the ingredients are incorporated.
- Pour equal amounts of batter into 6 cereal sized bowls. Using Wilton Color Right system, color each bowl a color of the rainbow.
- Pour batter into prepared pans, filling each approximately 3/4 full.
- Place pans in the preheated oven. Bake cakes for 30-35 minutes, or until a toothpick inserted into the center comes out clean. Depending on the size of the oven, you may need to bake this cake in two batches.
- Remove the pans from the oven and place on wire cooling racks for 25-30 minutes. Run a knife around the edges of the cakes, flip the pans over and gently extract the cakes. Return the cakes to the wire racks and finish cooling completely.
- While the cakes are cooling, make a batch of buttercream frosting. Reserve 1/2 of the frosting into a separate bowl for filling and crumb coat. Separate remaining frosting into 6 bowls. Using Wilton Color Right System, color each bowl of frosting a color of the rainbow (red, orange, yellow, green, blue, purple).
Buttercream Icing
- Combine the margarine and Crisco in an electric mixer fitted with a paddle attachment. Beat on medium until smooth, about 2 minutes.
- Add half of the powdered sugar and mix on low speed about 2 minutes or until mixture is creamy, scraping the sides of the bowl with a rubber spatula as needed. Add remaining powdered sugar, vanilla and milk, and beat until frosting is creamy and fluffy about 2 minutes.
Assembling the Cake:
- Using a serrated knife, remove crowns of each cake. With a small, round cookie cutter, remove one circle center from the middle of each cake. Repeat with each cake layer.
- Place an 8” cake board onto a cake turntable. Place the purple cake layer on board. Spread a thin layer of icing on top of cake using an angled cake spatula. Stack blue layer on top. Spread a thin layer of icing across the top of the blue cake. Repeat steps with green, yellow, orange and red layers.

- After final layer is stacked, pour gold sprinkle mixture (made up of gold sanding sugar, crystals, and pearls) into the hole in the center of the cake.

- Use angled cake spatula to cover the cake completely with a very thin layer of white frosting (or crumb coat) to help reduce the amount of crumbs in the final coat of icing. Set the cake aside for 20 minutes to “crust”.
- Fill 6 Wilton decorating bags each fitted with a 1A decorating tip with rainbow colored frostings. Fill 1 bag fitted with a tip with white icing.
- Starting with the purple icing bag held in a horizontal position, begin applying purple icing around bottom of the cake with even pressure while turning cake table with opposite hand. Repeat layer with blue icing and continue through remaining rainbow colors.

- Using a Dritz Hem Gauge (my favorite cake smoothing tool), begin to scrape the side of the cake as you rotate the turntable. Scrape excess frosting off and repeat until cake is smooth.
- Decorate the top of the cake with white icing bag fitted with the large star tip. Swirl circular motions around the top of the cake to create a cloud look. Continue until the entire top surface of the cake is covered.
Pin this idea for later!
THIS IS A SPONSORED POST. JENNY COOKIES HAS RECEIVED PAYMENT, TRADE AND/OR PRODUCTS FROM JO-ANN FABRIC AND CRAFT STORES IN EXCHANGE FOR PROMOTING, HOWEVER ALL OPINIONS STATED ARE MY OWN AND I ONLY PROMOTE PRODUCTS/COMPANIES I LOVE.
Photography by Kelly Clare Photography
Super fun and clever idea! Love the end result, those perfect smooth rainbow lines!! Great job hun!
So cute! Love it Jenny!
Love this! I just found your blog and so glad I did.
I’ve read every post so far. ?
I just have a few questions: As a cookie artist, I use a lot of Royal Icing. I see that you use buttercream. Does this harden? Can they be stacked without the icing being ruined? How long are the cookies good for? Thanks in advance for your help. I have so many customers that love my Royal Icing, but I would love to offer them another option.
Jenny I made this cake last year and it was fun but a lot of work. But it turned out beautiful. Linda carpenter